
Step-by-Step: Professional Home Improvement for Pros
In the world of high-end construction and remodeling, the difference between an amateur DIY project and a professional home improvement execution lies in the process. Professional contractors and seasoned tradespeople understand that quality isn’t just about the final coat of paint; it is about the structural integrity, the adherence to building codes, and the meticulous management of the job site. This guide breaks down the professional workflow for home improvement, providing a roadmap for those who aim to deliver elite results on every project.
Phase 1: Planning, Permitting, and Pre-Construction
A professional project begins long before a hammer touches a nail. The planning phase is where the most expensive mistakes are avoided. For pros, this phase is about aligning client expectations with structural realities and local regulations.
Comprehensive Site Assessment
Before drafting designs, a thorough inspection of the existing structure is required. Professionals check for load-bearing walls, outdated electrical systems (like knob-and-tube), and signs of moisture or pest damage. This assessment informs the budget and prevents “scope creep” later in the project.
Detailed Documentation and Permitting
- Blueprints and Renderings: High-end projects require architectural drawings or CAD designs to ensure precision.
- Permit Procurement: Never bypass local building departments. Professionals ensure all structural, electrical, and plumbing permits are secured to protect the homeowner’s investment and the contractor’s license.
- The Scope of Work (SOW): A professional SOW defines every material, timeline, and cost, leaving no room for ambiguity.
Phase 2: Site Protection and Controlled Demolition
Amateurs tear things down; professionals disassemble them. The goal of this phase is to remove what is unnecessary while protecting what remains. Site management is the hallmark of a professional contractor.
Advanced Dust and Floor Protection
Professional home improvement requires “living-ready” standards. This involves using heavy-duty Ram Board for floors, ZipWall systems to isolate dust to the work zone, and HEPA air scrubbers to maintain indoor air quality. Protecting the client’s home is as important as the renovation itself.
Strategic Demolition
Controlled demolition involves identifying utility lines—water, gas, and electricity—before any walls are opened. Using a “surgical” approach to demo reduces the cost of future repairs and ensures that structural headers and supports remain intact until temporary shoring is in place.
Phase 3: Structural Integrity and Rough-In Mechanicals
This is the “skeleton” phase. While the homeowner won’t see this work once the walls are closed, this is where the longevity of the home is determined. Professional home improvement focuses on “over-building” to ensure durability.
Framing and Subfloors
Pros ensure every stud is plumb and every floor joist is level. If a subfloor has a deflection, a professional uses self-leveling underlayment or sistering techniques to correct it. Precision here prevents squeaky floors and cracked tiles in the finishing stage.
The Rough-In Stage
- Electrical: Pulling wire according to the latest NEC (National Electrical Code) standards, ensuring dedicated circuits for heavy appliances.
- Plumbing: Using high-quality materials like PEX-A or copper and ensuring proper slope for drainage.
- HVAC: Modernizing ductwork for efficiency and ensuring proper airflow to every room.
Phase 4: Closing the Envelope and Surface Preparation
Once the rough-in passes inspection, the focus shifts to the “envelope.” This includes insulation, vapor barriers, and drywall. For pros, this phase is about thermal performance and creating a perfectly flat canvas for the finish work.
Insulation and Soundproofing
High-end projects often go beyond standard fiberglass batts. Professionals utilize rockwool for fire resistance and sound dampening, or spray foam for superior R-value and air sealing. This adds tangible value to the home’s energy efficiency.

Professional Drywall Hanging and Finishing
A “Level 5” finish is often the standard for professional interior work. This involves a skim coat over the entire surface to ensure that when light hits the wall, there are no visible joints or texture inconsistencies. Professionals know that the quality of the paint job depends entirely on the quality of the drywall prep.
Phase 5: High-End Finish Work and Aesthetics
This is where the craftsmanship becomes visible. The finishing phase requires patience and a “measure twice, cut once” philosophy. Professionals invest in high-quality tools to ensure that every miter joint is tight and every cabinet is perfectly square.
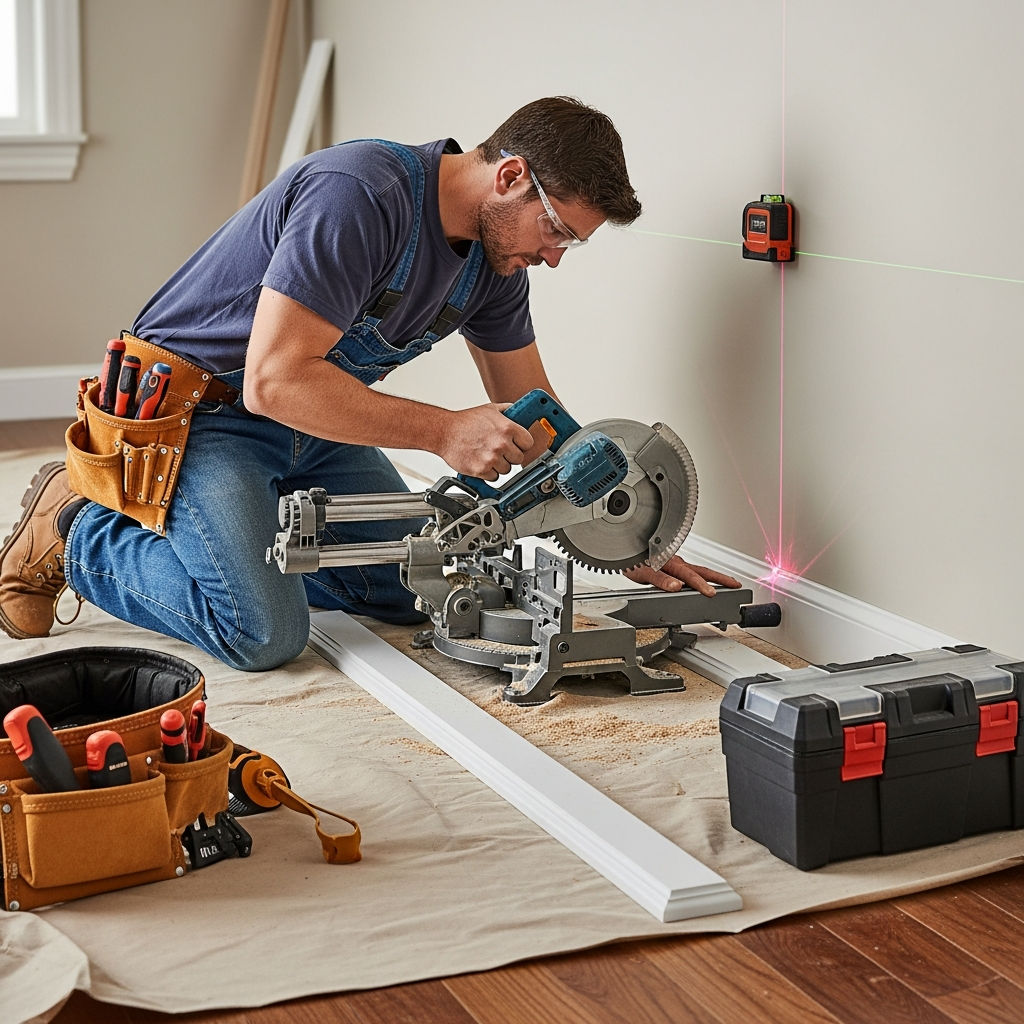
Cabinetry and Trim Carpentry
Custom cabinetry installation is a masterclass in precision. Pros use laser levels to ensure runs are perfectly horizontal across uneven floors. Trim carpentry—including crown molding, baseboards, and wainscoting—should have seamless returns and tight joints, often achieved through coping rather than simple mitering.
Flooring and Tile
- Hardwood: Acclimating the wood to the home’s humidity levels for at least 72 hours before installation to prevent gapping.
- Tile: Using decoupling membranes (like Schluter-Ditra) to prevent grout lines from cracking and ensuring layout symmetry to avoid small “sliver” cuts at the edges.
The Final Paint and Seal
Professionals don’t just “slap on a coat of paint.” They use high-quality primers, sand between coats, and utilize sprayers or high-density rollers for a factory-like finish. Caulking all trim-to-wall transitions with high-flexibility sealant prevents unsightly gaps as the house settles.
Phase 6: Post-Construction Cleanup and Final Walkthrough
The final 5% of a project is what defines a professional’s reputation. A project is not finished until the site is cleaner than when the crew arrived.
The Punch List
A professional contractor creates their own “punch list” before the client ever sees the finished product. This includes checking every outlet, testing every faucet, and looking for minor paint touch-ups. Resolving these issues proactively demonstrates attention to detail.
Mechanical Commissioning
For pros, the job isn’t done until all systems are tested. This means running the dishwasher through a full cycle, testing the HVAC’s thermostat accuracy, and ensuring all smart home integrations are properly synced.
Final Client Handover
The handover should include a “Project Manual.” This binder or digital folder contains all warranties, paint color codes, appliance manuals, and sub-contractor contact information. This professional touch ensures the homeowner feels supported long after the project is complete.
Conclusion: The Professional Standard
Professional home improvement is a disciplined sequence of events designed to produce high-quality, lasting results. By prioritizing planning, maintaining a clean job site, and refusing to cut corners on the “hidden” parts of a build, contractors can deliver projects that stand the test of time. Whether you are a general contractor or a specialized tradesperson, following this step-by-step professional workflow ensures that your work remains the gold standard in the industry.